Las Vegas homes don’t share a single look. One street has glass-walled contemporary builds framing the mountains; the next has Mediterranean shells with arches and tile; older neighborhoods hold mid-century ranches with good bones. That range is what makes picking an interior style harder than it should be — there’s no default answer, and the wrong choice is expensive to undo.
This guide works from your home outward: it starts with how you live, the light and views you already have, and the desert your home sits in, then points you to the styles that genuinely fit. By the end you’ll know which direction is yours — and how to plan the project around it.
The short version, before the details:
• A whole-home remodel moves through 12 phases, from planning and design through demolition, construction, and final cleanup — in a logical order you can prepare for.
• Several phases overlap (permits during design, material orders during demolition), so the whole project takes less time than the phases added up — but only when decisions are made on schedule.
• Slow decisions and late material orders, not slow crews, are what actually stall a remodel. This guide flags exactly when each choice has to be locked in.
• Most of the outcome is set before demolition even begins — scope, a budget with a cushion, the right team, and a clear plan.
The two words get used interchangeably, but they describe different projects — and the difference decides how long yours takes and what it involves.
A renovation refreshes what’s already there: new paint, flooring, fixtures, and finishes, with the layout left as it is. A remodel goes further, changing the structure or layout itself — moving walls, relocating a kitchen, opening up a floor plan, or adding square footage. A whole-home remodel usually blends both, across every room at once.
Why it matters: structural and layout changes trigger permits, inspections, and engineering, while cosmetic-only work often doesn’t. A remodel that reworks the layout naturally runs through more phases, and takes longer, than one that simply updates finishes. That’s the single biggest reason remodel timelines vary so much from one project to the next.
The hardest part of a remodel is usually the beginning — knowing what to do first. Start here, in this order:
- Define the scope. Write down what you want to change and why, then separate the non-negotiables (a bigger kitchen, a primary suite) from the nice-to-haves. Every estimate, timeline, and decision that follows leans on this.
- Set a realistic budget — with a cushion. Decide what you’re comfortable investing, then set aside an extra 10–20% for the surprises older homes hide behind their walls. A budget without a contingency isn’t a budget; it’s a hope.
- Choose your team early — ideally one that designs and builds. For a full-home project, a design-build firm that handles design, permitting, and construction under one roof removes the gaps — and the finger-pointing — between a separate designer and contractor. Check the license, insurance, and past work before you commit. This is also when you sign the agreement that governs the whole project.
- Plan around your life. Decide up front whether you’ll live through the work or move out for the disruptive stretches. That one call shapes both the schedule and the budget. Get these four right and everything after has a foundation. Rush them, and no amount of good construction makes up the difference. You can see how we structure that groundwork on our home remodel process page.
Plenty of remodeling is worth doing yourself. Painting, simple demolition, pulling up old flooring, basic landscaping — real ways to save money and put your own hands on the house.
Where DIY stops making sense is the whole-home scale. Structural work, electrical, plumbing, HVAC, and anything permit-driven carries code requirements and genuine safety risk. Trying to learn how to remodel a house yourself on the fly, across every system at once, is where budgets and timelines come apart. Roughly 9 in 10 renovating homeowners hire professional help for exactly this reason (
Houzz, 2026).
The honest split: keep the low-risk, satisfying jobs for yourself, and hand anything structural, permitted, or behind the walls to a pro. On a full-home project, what you’d save doing it yourself is almost always smaller than what a mistake costs in time and rework — so at this scale, hiring out isn’t the expensive choice. It’s the one that protects the budget.
We break a whole-home remodel into 12 phases. It isn’t an arbitrary number — it’s the natural set of hand-offs a house goes through, where each stage has to finish (or nearly finish) before the next can safely begin. Grouping the work this way is what makes a long project predictable. Start to finish, those twelve phases typically span 4 to 12 months on a whole-home project — less for a cosmetic refresh, more for a full gut.
Each phase below carries the same four labels, so you always know what you’re looking at:
• Duration — how long the phase usually takes on a whole-home project.
• Your role — how involved you’ll be, from active decisions to simply approving progress.
• Watch for — the detail or risk that most often trips people up at this stage.
• Result — what’s done and ready when the phase ends.
Durations are typical ranges, not promises — your home, scope, and finishes all move the numbers.
This is where the plan takes shape. You walk the house with your team, talk through what works and what doesn’t, and turn a wish list into a defined scope — an open main floor, a rebuilt primary suite, a resort-style backyard. The clearer things are now, the less room there is for scope creep and surprises later.
Duration: 1–3 weeks.
Your role: active — this is the project, defined.
Watch for: vague goals, which invite scope creep down the line.
Result: a defined scope, a ballpark budget, and clear next steps.
Design is the backbone of the project, not a finishing touch. Here the layout, the structural approach, and every finish get locked in — cabinets, countertops, tile, flooring, paint, and fixtures. The home’s systems are engineered now too, including an HVAC plan sized for the desert with a proper load calculation, so nothing gets guessed at once the walls are open.
This is also where a design direction gets chosen, and in the Las Vegas Valley that usually means one of a handful of looks — desert modern, warm minimalism, luxe transitional, modern Mediterranean, mid-century modern, or organic modern. The style you land on drives the material palette, and the palette is where the budget moves: quartz, quartzite, or natural-stone counters; porcelain or specialty tile; engineered or solid hardwood; shaker or flat-panel cabinetry. Not sure which direction is yours? Our
interior design styles guide walks through each one. Locking these choices now is what keeps the build from stalling later.
Duration: 4–8 weeks (longer for complex homes)
Your role: Active — most of the decisions happen here.
Watch for: leaving selections open; every undecided finish becomes a delay once the build starts.
Result: working plans, finalized selections, and 3D renderings.
With the design defined, the numbers get firm. The rough range from discovery becomes a detailed, line-item budget tied to the actual scope, and financing gets locked in — cash, a HELOC, a home-equity loan, or a renovation loan. (The overall agreement was signed when you chose your team; this is where its budget gets pinned to real drawings.) On a full-home project, payments are typically released in stages tied to milestones, so the money follows progress rather than sitting up front.
Duration: overlaps design.
Your role: active — you approve the budget and funding.
Watch for: skipping the contingency, or a payment plan that front-loads large sums before work is done.
Result: a firm budget, a milestone payment schedule, and financing in place.
Any project that touches structure, electrical, plumbing, or the exterior needs a permit; purely cosmetic work usually doesn’t. Review times depend on the jurisdiction — the City of Las Vegas, Clark County, Henderson, and North Las Vegas each run their own building department. Two local realities to plan for: your contractor must be licensed through the Nevada State Contractors Board, and if you’re in a community like Summerlin, Anthem, or Southern Highlands, HOA / CC&R approval adds a review layer before the city ever sees the plans.
Duration: 2–6 weeks [verify with current local data].
Your role: light — the team handles submissions.
Watch for: HOA approval, which runs on its own timeline and is easy to underestimate.
Result: approved permits and a green light to build.
The switch from paper to hammers. The team confirms final selections, schedules the trades, and sets up the site — dust barriers, floor protection, storage, access routes — while you pack up and clear the work zones. Long-lead materials were ordered back during design, so they’re already in the pipeline; this stage is about readiness, not waiting.
Duration: 1–3 weeks.
Your role: medium — pack, store, confirm.
Watch for: starting demolition before materials are ordered and selections are final.
Result: a protected home and a locked construction schedule.
Walls come down, old cabinets and fixtures are hauled out, and the space is stripped back to what stays. It’s the most disruptive stage of the whole project — not the hardest to build, but the one you feel most: noise, dust, and whole rooms suddenly out of use. It’s also usually one of the shortest.
Duration: 1–2 weeks.
Your role: light.
Watch for: hidden conditions — dated wiring, worn plumbing, or old water damage revealed once the walls open.
Result: a clean slate ready for rebuilding.
If the plan moves walls, vaults a ceiling, or adds square footage, this is where the bones of the house are rebuilt. Removing or altering a load-bearing wall calls for engineering and a support beam. The new layout takes physical form here for the first time.
Duration: 4–6 weeks.
Your role: light.
Watch for: a required framing inspection before work can continue — build it into the schedule.
Result: the new layout, framed and inspected.
With the frame up, the trades install everything that will live behind the walls — electrical wiring, plumbing lines, and HVAC ductwork. Much of it runs in parallel, coordinated so the lines don’t compete for the same space. The desert-ready HVAC system was sized back in design; here it’s physically installed, along with any solar or smart-home wiring — all far easier to run now, while the walls are still open.
Duration: 2–3 weeks.
Your role: light.
Watch for: rough-in inspections (often one per trade) before anything gets closed up.
Result: wiring, plumbing, and ductwork in place and inspected.
With the systems inspected, insulation goes in — matched to the right R-value for the desert envelope — and drywall closes up the walls. The rooms stop being a frame and start looking like a home again, ready for taping, texture, and paint.
Duration: 2–3 weeks.
Your role: light.
Watch for: an insulation inspection before drywall covers it.
Result: finished walls, primed for paint.
The longest, most detail-heavy stage: cabinetry, countertops, tile, flooring, trim, paint, and lighting, then appliances and plumbing fixtures. Sequencing is everything, and this is where late deliveries hurt most. Kitchens and bathrooms are the pressure points — they involve the most custom, long-lead materials and the most varied types of work, so a single backordered
kitchen remodel cabinet run or
bathroom remodel tile order can hold up the whole project. Order early, and this stage flows.
Duration: 6–10 weeks.
Your role: medium — approvals and walkthroughs.
Watch for: long-lead items; one late delivery can stall an entire room.
Result: a finished, near-complete home.
The final city inspection confirms the work meets code. Then you walk the whole home with your project manager, listing every small fix — a paint touch-up, a sticky drawer, a fixture to adjust. That punch list is your leverage; nothing is truly finished until it’s cleared.
Duration: 1–2 weeks.
Your role: active — walk every room.
Watch for: signing off before the punch list is genuinely complete.
Result: a signed-off, code-compliant home.
The last step is the one that makes the house feel like yours. A deep construction clean clears the dust the work leaves behind, everything set aside earlier comes back into place, and you get the keys along with a care guide for the new finishes and systems. Then it’s simply home again.
Duration: about 1 week.
Your role: medium.
Watch for: confirming warranties and care instructions are handed over.
Result: a finished home, ready to live in.
Read as a list, the phases look purely sequential. In practice they overlap, and a timeline graphic shows that far better than words.
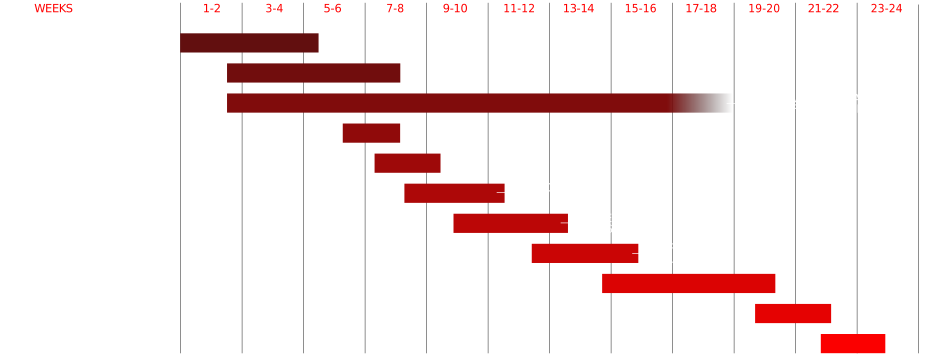
Why the whole project is shorter than the phases added up. Total every phase in isolation and you’ll get a number no real project hits. Because permitting overlaps design, materials are ordered while earlier work continues, and some trades work side by side, weeks get absorbed rather than stacked. What actually sets the finish date is the critical path — the longest unbroken chain of tasks that must happen one after another, usually running straight through custom cabinetry and other long-lead materials. Shorten that path (mainly by deciding and ordering early) and you shorten the whole project. Everything off the critical path has slack; the critical path has none.
On a whole-home remodel, the finish date is set less by how fast the crews work and more by when materials arrive. Lead time is the gap between ordering an item and having it on site — and for custom pieces it can run longer than the construction around it, which is why long-lead materials sit squarely on the critical path. The table below gives typical ranges — but confirm each one at the moment you order, because the same product can quote very differently by supplier and by season. What stretches a lead time: whether an item is stock or made to order, how far it ships (imported stone, tile, and appliances travel longest), seasonal demand, and how much of it is customized. A stock vanity is days away; cabinetry built to your drawings is weeks.
Material
Typical lead time
Custom cabinetry
8–12+ weeks
Natural stone / quartz / quartzite countertops
2–6 weeks
Specialty or imported tile(porcelain, mosaic)
4–10 weeks
Windows (custom)
8–12+ weeks
High-end / importedappliances
8–16 weeks
Custom entry doors
8–14 weeks
Designer plumbing fixtures
4–10 weeks
Most delays don’t come from slow crews — they come from decisions made late. Each choice below has a point of no return: make it after that point and you pay in time, money, or both. Here’s the deadline for each, and what a late call actually costs.
• Before permits — layout, structural changes, window and door sizes and locations. These define the drawings the city reviews. Change them after submission and you may be resubmitting for approval, restarting the clock.
• Before demolition — cabinets, appliances, and long-lead materials, ordered. Their lead times are the longest on the project, so they need to be in motion before the first wall comes down, or they’ll hold up the finish stage months later.
• Before rough-ins — the electrical plan, plumbing fixture locations, and HVAC design. Once wiring and pipe are in the walls, moving an outlet, a shower valve, or a duct means opening framing back up.
• Before drywall — anything that lives inside the walls: recessed niches, blocking for heavy fixtures, low-voltage and solar runs. After drywall closes, adding them means cutting it open again.
• Before finishes — tile, flooring, countertops, paint colors, and hardware. Late changes here rarely delay the structure, but they stall the room and can strand materials you’ve already paid for.
The pattern is simple: the deeper into the build a decision reaches, the more it costs to change. Decide early, and the schedule stops waiting on you.
The projects that go sideways tend to repeat the same handful of errors:
•
Starting demolition before the design is final. The most expensive changes are the ones made after the walls are already open.
•
Under-budgeting the contingency. Skip the 10–20% cushion and the first hidden surprise turns into a crisis.
•
Choosing a contractor on price alone. The lowest bid often means the thinnest scope — or a license you should have checked.
•
Ordering materials late. Custom cabinets and imported tile don’t care about your deadline.
•
Expanding scope mid-project. Adding a room or upgrading finishes once work is underway is one of the fastest ways to blow a timeline and a budget — and it’s a real temptation, with high-end renovation spend still climbing year over year (
Houzz, 2026).
•
Ignoring the desert. Undersized HVAC and the wrong exterior materials cost you comfort and money for years.
Phases are easier to picture against a real home. Our “Desert Inn” project was a full-house remodel built around resort-style outdoor living — a private backyard oasis paired with a fully reworked interior.
Outside, the scope centered on a brand-new pool, custom-built cabanas, and an integrated outdoor kitchen and dining area — the kind of backyard that turns a house into a place people gather. Inside, the work ran to custom wall accents, floor-to-ceiling tile, and custom stainless-steel kitchen cabinetry, carrying the same entertainer’s brief through every room.
A project like this touches nearly every phase in this guide at once: discovery to define the resort-living vision, design to resolve the indoor and outdoor spaces together, structural and rough-in work for the new pool systems and kitchen, and a finish stage where tile, cabinetry, and the outdoor build all had to be sequenced so nothing waited on anything else. It’s a clear case for a full-cycle team — designing and building under one roof — on a project with this many moving parts. See the
full project for photos of how it came together.
Everything in this guide comes down to doing the right things in the right order — which is exactly what a checklist is for. We put together the DesignZone Remodeling Home Remodel Checklist, so you don’t have to hold the entire process in your head. It follows the same four stages as this guide — planning, design and pre-construction, construction, and closeout — and turns each into a short list of concrete steps: defining scope and setting a contingency, vetting a licensed contractor, locking selections and ordering long-lead materials, tracking inspections at each stage, and walking the final punch list.
Keep it beside you from the first planning conversation to move-in, check items off as you go, and nothing critical slips.